
Water Pumping Module
In this lab subsection, we're looking at measuring the power you can produce by pumping water to a certain height using your arms and legs. Start by guessing how much more power your legs can produce than your arms.
The pumps you will be using have been developed for different applications in the developing world, and are both examples of appropriate technologies. The first of these pumps is the Escuela Móvil de Agua y Saneamiento (EMAS) pump developed by Wolfgang Buchner in Bolivia. It is a PVC hand pump that uses two one-way valves, and pumps on the down stroke. The second pump is the Full Belly Project Pump that is designed and developed by Jock Brandis, and is a cement rocker pump.
We will be estimating the power output by pumping water and calculating the pressure and flow rate of the water. It is important to remember that this is an approximation, as the pumps themselves have different efficiencies. We should start with the definition of power in a system with fluid flow:
P = p x Q
where p is pressure (Pa) and Q is the volumetric flow rate (m3⁄s)
For each pump:
- Measure Q:
While we can measure the volumetric flow rate using a variety of sensors, in this lab we will be using five-gallon buckets and measuring the time it takes to fill them using a stopwatch.
- Measuring p:
We can approximate the pressure of the fluid by using the hydrostatic pressure equation:
p = ρgh
where ρ is the density of the fluid, g is the gravitation acceleration, and h is the height of the fluid
- Calculate P
Based on your measurements, calculate the power.
Water Carrying
Try out all forms of water carrying. For each method, go from our 2nd floor class room to our 1st floor workshop and back, via the stairs.
- Tump line
- Head carry
- Hand carry
- Q-drum
Note the differences in each experience.
Shop Training
In order to familiarize yourselves with the shop equipment and prepare for a future lab, you will have the task of cutting wood and drilling pilot holes in it using a variety of tools. The stock you will have to work from is a 1" x 6" piece of wood that is 8 feet long. In teams of two, you will have to make: one 1" x 6" x 20 cm piece with notches, two 1" x 1" x 30 cm pieces, and one 1" x 1" x 20 cm piece and then drill pilot holes in them. Keep a list of the tools that you are using.
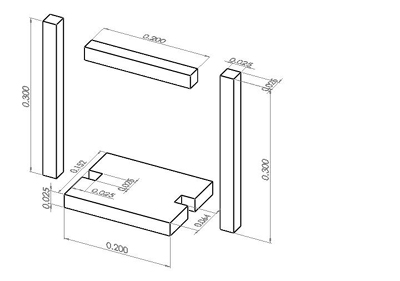
Woodworking design for shop training.
Along with this woodworking assignment, students will also have the opportunity to experiment with the following:
- Drilling holes in sheet metal with a drill press
- Cutting copper and PVC pipe with hand tools
- Cutting rebar with a hacksaw
- Spot welding
- Sheet metal bending
- Using a pop-rivet tool